
test embed scribe
Getting started with the Eclipse Net Cloud VMS Platform
This guide provides an overview of the Eclipse Net Cloud VMS Platform, explaining how it works, what features are available, and how to get started. It covers the different portals, such as the Admin Portal, Video Portal, and Alarm Station, and explains how to navigate and use the platform. It also provides information on user levels and types, including integrators, managers, and customer-level users. This guide is essential for anyone who wants to understand and effectively use the Eclipse Net Cloud VMS Platform.
Getting started with the Eclipse Net Cloud VMS Platform
1. Welcome to the Eclipse Net platform. This walk-through will help you understand how our platform works, how to get started, what features are available to you, and where and how you can access different services. On this page, you will find links to useful resources, articles with instructions, and links to download the required files to get you started.
Eclipse Net Architecture
2. Eclipse Net VMS has 3 different Portals:
You have an option to co-brand each of the above portals. This will allow you to modify the login page and interface colors of the video portal to match your company colors.
Admin Portal
3. Admin Portal acts as the backend Portal for Eclipse Net. Integrators can add new Customers and manage all aspects of the clients' lifecycle through the Admin Portal. Customers can create different users for their accounts and can define the level of access for every person. There are no limits on the number of users you can create and by default, we allow up to 10'000 simultaneous viewers for the same camera.
Most of the Admin portal menus are built as spreadsheets and can be sorted and searched just like any regular spreadsheet. Every table will have its own columns which can be modified and sorted individually.
4. Navigate to Admin Dashboard
Dashboard
5. Click "Dashboard"
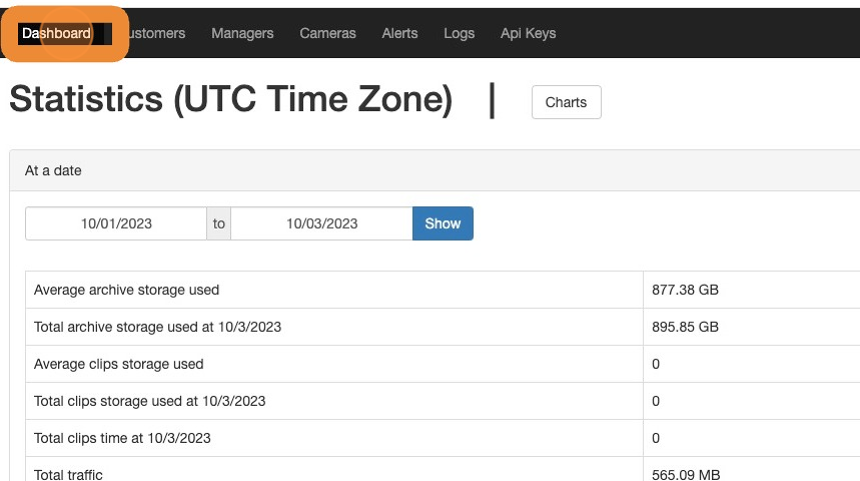
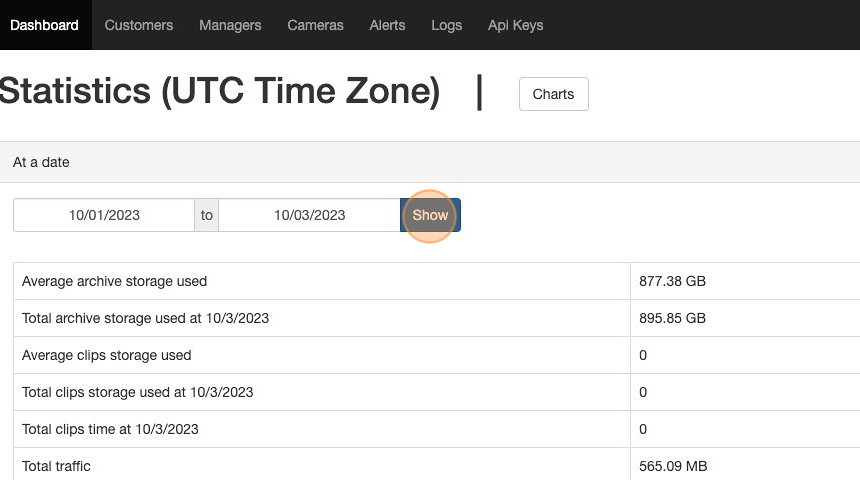
6. Every time you visit the Admin portal you will be greeted by the Dashboard page. This page is common in both Integrator and Customer Level Interfaces. The Integrator level sees statistics of all of his customers while individual customers will see statistics for their account only. To view statistics for a different date range simply choose start and end dates and click the Show button.
7. Click "Show"
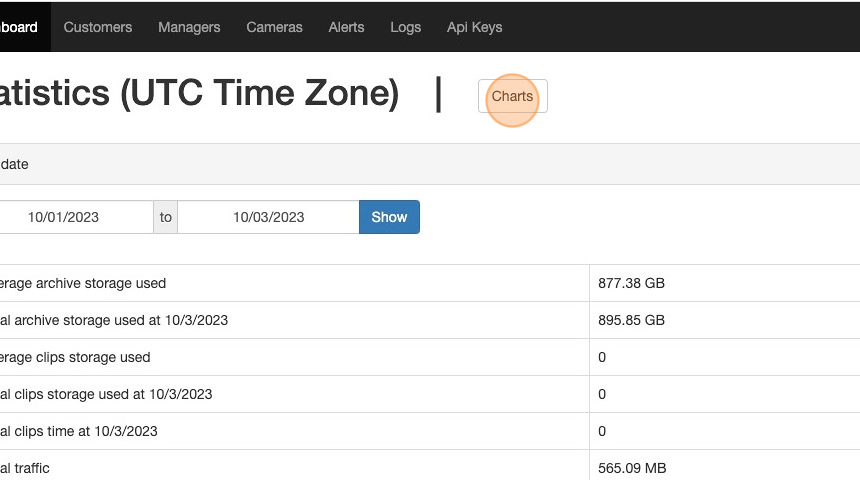
8. To view statistics in a graphical form use the Charts button , this will open a new page with a camera by camera statistics showing overall storage, traffic, and clip duration accumulated in the past 3 months. On these graphs, you can limit the data range and view the statistics for a selected camera and selected dates
9. Click "Charts"
User Levels and Types
10. There are two levels of clients that you can create in our system:
Integrator Level
Customer Level
Integrator Level users:
- An integrator is a partner who has the ability to connect new Customers to the Eclipse Net services. This is a top-level user, who has control over all other types of users. Integrator can create new users of all types, modify existing users, and set permissions to control access to the Admin and Video portals as well as control access to billing modules.
- A manager is a user on the integrator level and can be created by the integrator to help with customer management tasks. Managers have the same level of access as an integrator does with the only exception - a manager cannot delete or edit integrator users while the integrator can delete managers.
Tip: Note: Integrator-level users can not log in to the Video portal. This limitation is intentional and it is intended for the protection of the privacy of the end customer since the activity of the integrator level user is hidden from the logs on the customer level. There is no super admin role in the Eclipse Net platform and only customer-level users who have been given permission to view cameras can access the video feeds from the cameras to view footage from the cameras. Thus if an integrator or a manager has a need to review footage from a specific camera they will have to create a tech support user on the customer level and use this user to access the video portal.
Customer Level Users:
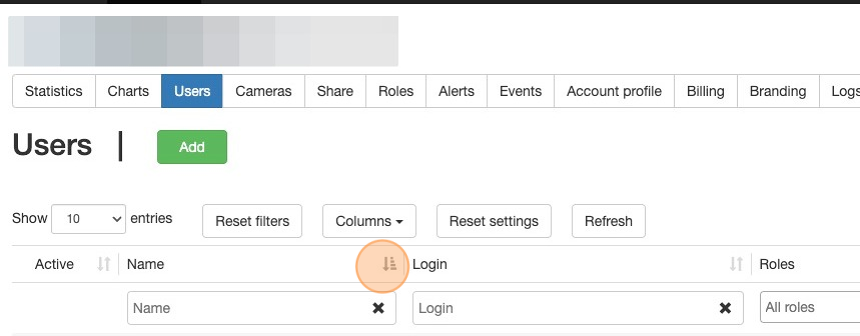
11. The user's menu allows customers and integrators to create users with the required role types, having either limited or full access to the video and admin portals. User's lists can be sorted by any of the columns and you can configure which columns are visible from the Columns dropdown menu. The same sorting principles apply to all tables in the admin portal.
12.
13. You can create two user types and the third, the owner type, is a system type and is created when a new customer is added. Each customer account can have just one owner-type user. You can assign any admin-type user as a new owner, when this is done the previous owner user will become an admin.
The owner always has access to all cameras under the customer's account unless access to the admin portal for the whole customer is restricted by the integrator.
\
Admin is a user with access to the Admin portal. This user can view and configure cameras and alert settings according to the permissions assigned in their roles. Admins can add new cameras and modify the cameras according to the permissions that were granted by the customer or integrator.
\
Guard is a user without access to the Admin portal. Can only view assigned cameras through the video portal or mobile app, create clips, use PTZ controls, and/or share cameras with others according to the assigned role permissions.
Updated on: 10/04/2023
Thank you!